Automated EC2 Configuration Management Using Ansible
 In our last Ansible post I covered how to create new AWS EC2 instances using Ansible. Today I will cover how you can use Ansible to both manage and automate your configuration management needs in you AWS environment. While the examples shown below are specific to an AWS cloud environment, the concepts used are the same for any type of infrastructure and can be used in a similar fashion on other cloud platforms as well as your private server infrastructure.
Today's examples will focus on installing and configuring Apache and PHP on two separate web server pools. However, for the most part, any Unix system/service can be managed this way so long as they are configurable via a standard text file.
Before continuing any further, please note that all of the files created below can be found here for reference: https://github.com/kissit/kiss-ops.
New concepts
In our last Ansible post, we introduced you to the concept of Playbooks. We will build on those here today, but we will also introduce you to some new concepts. One such concept are Ansible templates, which are made powerful by using the Jinja2 templating language. By building templated configuration files for our services, we can leverage Ansible variables, groups, and EC2 tags to dynamically build configuration files and deploy them to our servers.
Using EC2 Tags to define our group variables
Back in our first introductory post on Ansible, we mentioned the concept of group_vars in our Best Practices directory layout. Lets start to leverage group_vars to map to our EC2 tags to classify our instances. Doing so will require that the Ansible plugin for EC2 be installed and configured as per this post. In this example, we will install and configure Apache & PHP for two different classifications of web servers, lets call them app1 and app2. We will need to do the following to define different variables for each:
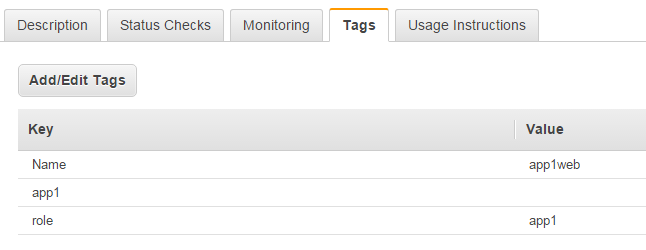
- Add a Tag on each EC2 instance running app1 named app1. Likewise add a tag on each instance running app2 named app2. The following screenshot shows an example of the app1 tag on an instance.
- Create a file in the group_vars directory of our Ansible project that corresponds to each EC2 tag, specifically tag_app1 and tag_app2. Note that we have to prefix these files with tag_, this is how the EC2 plugin returns the groupings of instances based on tags.
Once the above is complete, its time to add our variables to the groups_vars file for each app. In our case we'll configure them as follows, first the group_vars/tag_app1 file:
---
vhost_name: app1
vhost_server_name: app1.domain.com
vhost_directory: /var/www/app1
And then the group_vars/tag_app2 file:
---
vhost_name: app2
vhost_server_name: app2.domain.com
vhost_directory: /var/www/app2
Finally, we're also going to add a group_vars/all file. This file will be used to configure default values for variables that either will be the same across all or most all of the groups. The values of the variables can then be overridden in later group_vars files. In our case, lets set our PHP configuration options here that will be consistent across the two applications but may need to be tweaked for other applications.
---
php_timezone: America/New_York
php_memory_limit: 64M
Now, when a ansible playbook is being run, the variables in the group_vars/all file will be available to us to use in our templates. Furthermore, the variables in group_vars/tag_app1 will be available on instances tagged with app1, the same with group_vars/tag_app2 and instances tagged with app2.
Using EC2 Tags to determine our role(s)
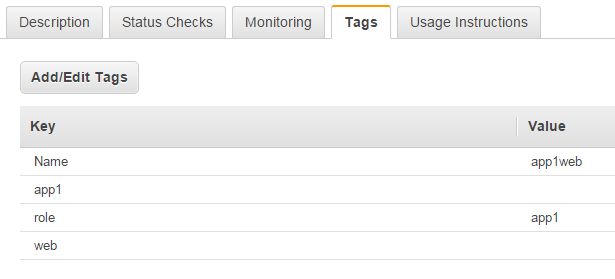
Next, we will also tag our instances in such a way that we can dynamically map them to Ansible roles. While you could leverage the tags we created in the previous step lets create a new tag, web, for all instances that should belong to what we'll also call our web role in Ansible. This will be where we'll define our plays/tags specific to installing and configuring Apache & PHP on our instances. After adding this tag our AWS instances should now look similar to the following in terms of tags:
And to tie it together, we'll create a new file to serve as our main playbook that we'll use for our dynamic AWS environment named site.yml. For now this fille should look as follows:
---
- hosts: tag_web
  sudo: yes
  gather_facts: False
  tags:
  - web
  roles:
  - web
Essentially, what this block does is tell ansible that when running this playbook, all instances with a tag named web should be added to the web role. As we add more roles, we can add them in a similar fashion and setup the tags as needed on the instances
Defining our web role
Now we need to create our web role in ansible so that we can write our playbooks. Again this concept was mentioned back in our first introductory post on Ansible on best practices of setting up your ansible project. In our case, we will have to create a new directory structure and files under the roles directory, specifically the following
roles/web/
roles/web/handlers/
  - main.yml
roles/web/tasks/
  - main.yml
  - install.yml
  - configure.yml
roles/web/templates/
  - httpd_custom.conf
  - default_vhost.conf
  - php_custom.ini
First, lets define our handlers that we'll use for controlling our services during install and reconfiguration. This is done in the file roles/web/handlers/main.yml. For example I'm going to define handlers for both enabling httpd to start at boot time as well as to restart httpd when we push configuration changes.
---
- name: restart httpd
  service: name=httpd state=restarted

- name: enable httpd
  service: name=httpd enabled=yes
Next, lets define our task to install the Apache and PHP components. This will be done in the file roles/web/tasks/install.yml. The following is an example however it can be modified to suit, include or exclude PHP modules as needed, etc. Note that we are using the IUS Community Project as a source for our LAMP stack components on CentOS 6.x.
---
- name: "Install IUS repo"
  yum: name="https://dl.iuscommunity.org/pub/ius/stable/CentOS/6/x86_64/ius-release-1.0-14.ius.centos6.noarch.rpm" state=present

- name: "Install HTTPD packages and enable startup on boot"
  yum: name={{ item }} state=latest
  with_items:
    - httpd
    - httpd-devel
    - httpd-tools
  notify: enable httpd

- name: "Install PHP packages"
  yum: name={{ item }} state=latest
  with_items:
    - php56u
    - php56u-cli
    - php56u-common
    - php56u-devel
    - php56u-gd
    - php56u-gmp
    - php56u-mbstring
    - php56u-mcrypt
    - php56u-mysqlnd
    - php56u-opcache
    - php56u-pear
    - php56u-pecl-igbinary
    - php56u-pecl-jsonc
    - php56u-pecl-jsonc-devel
    - php56u-pecl-redis
    - php56u-process
    - php56u-xml
Everything being done in the above task is pretty standard Ansible stuff, however, a few points worth noting:
- We use the with_items option to loop over our package lists to pass the names to the yum module. This is much cleaner than doing each separately in its own command.
- The notify option is used to notify our enable httpd handler defined in the previous step to set the httpd service to start at boot. By using notify, we only do that if the command resulted in a change. So if you rerun this task, since the packages are already installed, it will not call the handler again to enable the service (not that it would hurt if it did).
Next, lets define our task to configure what we installed in the previous step. This will be done in the file roles/web/tasks/configure.yml. The following is an example and can be modified to suit.
---
- name: "Configure our custom httpd configuration file for system wide settings"
  template: backup=yes src="httpd_custom.conf" dest="/etc/httpd/conf.d/httpd_custom.conf"
  notify: restart httpd

- name: "Configure our httpd vhost configurations"
  template: backup=yes src="default_vhost.conf" dest="/etc/httpd/conf.d/{{ vhost_name }}.conf"
  notify: restart httpd

- name: "Configure our custom PHP configuration file to override the defaults as needed"
  template: backup=yes src="php_custom.ini" dest="/etc/php.d/php_custom.ini"
  notify: restart httpd
---
- include: install.yml tags=install_web
- include: configure.yml tags=configure_web
NameVirtualHost *:80
# {{ ansible_managed }}
NameVirtualHost *:80
<VirtualHost *:80>
    ServerName {{ vhost_server_name }}
    DocumentRoot "{{ vhost_directory }}"
    <Directory "{{ vhost_directory }}">
        Options -Indexes FollowSymLinks
        AllowOverride All
        Order allow,deny
        allow from all
    </Directory>
</VirtualHost>
; {{ ansible_managed }}
date.timezone = {{ php_timezone }}
memory_limit = {{ php_memory_limit }}
A few notes in regards to the above three templates:
- You'll noticed at the top of each I use the built-in variable {{ ansible_managed }}. This is not required but it will include a nice timestamped message including the originating host information in the files. Just make sure you comment out this line if you use it too.
- In our examples, the variables for the Vhost configurations are coming from the group_vars for app1/app2. However, the variables for the PHP configuration are coming from group_vars/all. This was to show how you can define variables the same for all hosts vs differently for different groups and an example only.
Running the tasks to configure your environment
It was a long time getting here but we should now be ready to use what we've built to install and configure Apache and PHP on one or more web servers in each group app1 and app2. In my case, I have created two new instances as follows:
- Instance named app1web, with EC2 tags app1 and web.
- Instance named app2web, with EC2 tags app2 and web.
- I've also created the vhost directories on each as if our sites/apps were deployed there. Ideally this would be automated as part of our process but its outside of the scope (of this post anyway).
First, lets run just the task to install Apache and PHP by running the following command. I've included the output as an example of what to expect:
$ ansible-playbook site.yml -i inventory/ec2.py --limit=tag_web --tags=install_web -u centos

PLAY [tag_web] ****************************************************************

TASK: [web | Install IUS repo] ************************************************
changed: [1.1.1.1]
changed: [2.2.2.2]

TASK: [web | Install HTTPD packages and enable startup on boot] ***************
changed: [1.1.1.1] => (item=httpd,httpd-devel,httpd-tools)
changed: [2.2.2.2] => (item=httpd,httpd-devel,httpd-tools)

TASK: [web | Install PHP packages] ********************************************
changed: [1.1.1.1] => (item=php56u,php56u-cli,php56u-common,php56u-devel,php56u-gd,php56u-gmp,php56u-mbstring,php56u-mcrypt,php56u-mysqlnd,php56u-opcache,php56u-pear,php56u-pecl-igbinary,php56u-pecl-jsonc,php56u-pecl-jsonc-devel,php56u-pecl-redis,php56u-process,php56u-xml)
changed: [2.2.2.2] => (item=php56u,php56u-cli,php56u-common,php56u-devel,php56u-gd,php56u-gmp,php56u-mbstring,php56u-mcrypt,php56u-mysqlnd,php56u-opcache,php56u-pear,php56u-pecl-igbinary,php56u-pecl-jsonc,php56u-pecl-jsonc-devel,php56u-pecl-redis,php56u-process,php56u-xml)

NOTIFIED: [web | enable httpd] ************************************************
changed: [1.1.1.1]
changed: [2.2.2.2]

PLAY RECAP ********************************************************************
1.1.1.1               : ok=4    changed=4    unreachable=0    failed=0
2.2.2.2                : ok=4    changed=4    unreachable=0    failed=0
- site.yml - This is the name of our main playbook above where we defined the relation of the hosts tagged with the web tag to the web role.
- -i inventory/ec2.py - This tells ansible to use our EC2 plugin as the source of its inventory.
- --limit=tag_web - This limits our run to only those instances tagged with tag_web. In our case we don't have any others but in a larger environment where you have various roles and groups, this is needed to target only those servers you intend to.
- --tags=install_web - This tells ansible to run our task that maps to the tag install_web (configured where we include our individual tasks). Likewise, we could have used --tags=web here to run both of those tasks at the same time since we included a tag named web at our main playbook level. Personally I find being able to run the tasks independently much more helpful in an ongoing maintenance scenario verses the initial setup of an instance.
- --user=centos - Since I'm working with fresh instances that I just built from our standard CentOS 6 image, I don't have my normal users configured so I use this to tell ansible to run as the centos user on the remote hosts.
Finally, lets run just the task to configure Apache and PHP by running the following command. Once again I've included the output as an example of what to expect:
$ ansible-playbook site.yml -i inventory/ec2.py --limit=tag_web --tags=configure_web --user=centos

PLAY [tag_web] ****************************************************************

TASK: [web | Configure our custom httpd configuration file for system wide settings] ***
changed: [1.1.1.1]
changed: [2.2.2.2]

TASK: [web | Configure our httpd vhost configurations] ************************
changed: [1.1.1.1]
changed: [2.2.2.2]

TASK: [web | Configure our custom PHP configuration file to override the defaults as needed] ***
changed: [1.1.1.1]
changed: [2.2.2.2]

NOTIFIED: [web | restart httpd] ***********************************************
changed: [1.1.1.1]
changed: [2.2.2.2]

PLAY RECAP ********************************************************************
1.1.1.1               : ok=4    changed=4    unreachable=0    failed=0
2.2.2.2                : ok=4    changed=4    unreachable=0    failed=0
As you can see, this command is almost exactly the same as the last, only we replaced our tag name with configure_web to run that task. Now, if I go out to my app1web server and check configurations, I see that I have my custom /etc/httpd/conf.d/httpd_custom.conf, my vhost corresponding to app1 in /etc/httpd/conf.d/app2.conf, and my custom php configuration in /etc/php.d/php_custom.ini. Likewise, I have the exact same on my app2web server only with my vhost corresponding to app2. Pretty neat eh?
Conclusion
In conclusion, if you stayed with me to the end I thank you for your time and hope that you find this post useful. Obviously this is a simple example but I hope its easy to see how powerful this concept is in terms of managing a large AWS environment configuration simply by planning out your infrastructure and tagging your instances accordingly. Stay tuned for our next post in the Ansible series where I will show you how you can build a dynamic configuration for nagios to monitor your environment and have a single playbook to use to continually manage this configuration. As always, please don't hesitate to contact us with any questions or comments regarding this post.